Thursday, June 20, 2013

Indi Thursdays: Sindie POP! Mrs. Duck and Dark Side

Hello everyone! For this week's Indie Thursdays (it's Thursday already..?!) I have two polishes from Sindie POP! Lacquer to share with you.

(Side note: I didn't have time to tinker with the curved watermarks, so I went back to my default watermarking app.)

Like almost all other indies I own (which isn't really a lot,) I found out about Sindie POP! on, where else, Instagram! I swear that app will be the death of my wallet! Anyway, I saw Selena's (of @selenadee_nails on IG) swatch of Dark Side, and I knew immediately that I had to have it too!

Here is Sindie POP!'s intro (copied from her website:)


I'm a girl with an infatuation with glitter, so I decided to share it with the world. I custom make all of my nail polishes by hand in my own house. All of my lacquers are 3 FREE: No Formaldehyde, DBP, or Toluene around here.

ONLY DOMESTIC U.S.A. (50 states) shipping is available. 
PLEASE READ THE PRODUCT'S DESCRIPTION, MY TERMS AND CONDITIONS PAGE, AND MY FAQ PAGES BEFORE PURCHASING.


Welcome to Sindie POP!


Anyway, without further ado, here is Mrs. Duck:


Check out all that glitter! Mrs. Duck is a sheer milky white base chock-full of periwinkle and gold medium hex glitters, tiny violet, gold and holo (holo!) glitters, and micro periwinkle glitters. Holo=holographic. Believe me when I say it's packed with glitter; I got a pretty decent amount on the first coat, but the base was still sheer at that point so I did three coats. (I'm a glitter hoarder like that. Haha.) It dries gritty due to the amount of glitter in it, so be sure to load up on top coat! (It also helps bring out the glitters more. I love watching a glitter polish transform whenever I put top coat on!)


Here is Dark Side.


Dark Side is a black jelly base with small purple, periwinkle, gold, and teal hex glitters, plus smaller holo (holo!) glitters. This. This is the polish that made me order Sindie POP! in the first place. I love this polish! If you loved Zoya Storm, you will love this polish. If you love black-based glitter, you'll love this. Heck, I think you'll love this polish even if you don't love black, glitters, or holo! (But seriously though, who doesn't love holo?!) The first time I swatched it I think I used three coats, but I've learned my lesson since then and did just two coats. Again, with the amount of glitter, load up on top coat.

Fun fact: Sindie POP! has polishes with "counterparts." For example, Mrs. Duck has a combo polish named Mr. Duck. Dark Side has a combo, or complementary (yes, with an E) polish called Bright Side. Cool, huh?


Thoughts? I love these polishes! I'm so sad I wasn't able to order more, but I definitely will in the future. The formula is good, glitter payoff is great, and dry time is pretty decent. While I really prefer a short and squat brush (Sindie POP! has a long cap/handle, long brush stem and rounded brush) the brushes on these polishes wasn't really an issue. The length of the cap/handle was pretty daunting to me at first but you'll get used to it. The brush also fans out nicely and doesn't make it streaky or leave bald patches.

Will I recommend these polishes? YES! Obviously. Have I told you that I love these polishes? Oh. Haha. Anyway, while the price might be a little steep for others ($9 plus shipping) it's totally worth it. Indies do tend to be a bit more expensive due to the uniqueness of it, and the time and effort it takes to make them. Remember, it's almost always just one or two people doing all the work! And isn't it worth paying just a little bit extra to own and wear a polish that's unique and one of a kind? :)


That's it for this week's Indie Thursdays! I hope you enjoyed this post, and see you next time!


*I bought these polishes with my own money. You can purchase Sindie POP! Lacquer here. Polishes are $9 plus shipping.*


*Disclaimer: Due to variations in screen displays and resolutions, polishes may appear different to each reader. I try my best to capture colors as accurately as I can, and if I can't, then I try to describe the color/s to the best of my ability.*

Wednesday, June 19, 2013

On Wednesdays We Wear Pink: Tape Mani

Hiiiiii everybody! It's Wednesday once again, and you know what that means: it's OWWWP time! 

Lately I'm obsessing over tape manis ever since I decided to recreate this mani by Nicole of the Young Wild and Polished blog. I've been following her on Instagram and she's holding a contest of a recreation of her mani. But, sad thing is I needed to also have a YouTube account (which I don't have) so I can't join. I still decided to draw inspiration from her and since then, I'm hooked on tape manis!


I used two pinks for this mani: Orly Artifical Sweetener and Sinful Colors Folly.

I used the Orly for the base and the Sinful Colors for the secondary color.

In hindsight, I should've taken the opportunity to do a tutorial for you guys, but I'm just going to save that for sometime. (Hmm... I'm getting an idea... Tutorial Tuesdays, anyone?)


I used striping tape to make the thin lines. If you're wondering what striping tape looks like, it looks like this:


I bought my striping tape from eBay (the name of the seller escapes me right now) and they're pretty cheap. If you're ordering from a seller from China, it's like a dollar or so for about eight to ten rolls, but shipping can take anywhere from one to four weeks. I ordered mine from a US seller; it's about $3 (with free shipping) but it came in less than a week. I got eight rolls.


Here is the end result of my OWWWP tape mani:


Don't you just hate it when the color doesn't translate well on camera? Folly (the bright pink) is less red and a more darker pink in person. It pretty much looks like a neon. It's very shiny though, which explains the crazy glare.

I tried taking a picture outside in sunlight just to see if the camera will pick up the color better, and here is how it looks like:


It still looks pretty much the same to me. Gahhh I hate when I can't capture the true color!


I really enjoyed doing this mani, even though it's a bit time-consuming and painstaking to place the tape just right. I do have a tip, and that's to remove the tape as soon as you can, because if you take too long to remove it, the polish will start to get stringy and stick to the tape. Also, make sure the base coat is completely dry to avoid it getting pulled by the tape.


I hope you enjoyed today's post, and I hope to see you again on the next OWWWP post!


*I bought these polishes with my own money. Orly can be found at beauty supply stores, Sally Beauty, and you can check their website and enter your zip code to find a salon near you. Sinful Colors can be found at most drugstores and at Target and Walmart.*


*Disclaimer: Due to variations in screen displays and resolutions, polishes may appear different to each reader. I try my best to capture colors as accurately as I can, and if I can't, then I try to describe the color/s to the best of my ability.*

Monday, June 17, 2013

Mainstream Mondays: Revlon Cabana Queen and Coast is Clear

Hi errbody! It's that time of the week again. Time flies by so fast, doesn't it? Well today I have two Revlon polishes for ya, Cabana Queen and Coast is Clear.

These two polishes are from the Revlon Haute Tropics 2013 collection. It has been available for sometime now, like a few weeks ago. I bought these polishes a while back and it has been sitting in my untried pile since then. So now I decided to bust them out for this week's Mainstream Mondays' post.


Photo credit: Steph's Closet

Looking back, I now wonder why I didn't purchase the other blues in this collection, knowing my love of blues. Oh well. Anyway! Let's get right to it!


First up: Cabana Queen.


Sorry for the crappy watermark, I've been experimenting with a new watermarking app .

Cabana Queen is a very light gray with opalescent microshimmer throughout. The shimmer makes it so that it is not your average grey creme. Application was like a crelly, felt more like a jelly to me but more opaque. I used four, yes FOUR, coats for this bad girl, plus top coat. Not that it needed it, but I just like to finish swatches off with top coat.


And here is Coast is Clear.


I need to trim my nails!

Coast is Clear is a minty green, I guess you could say seafoam since we seem to be going with a summer theme here. Like Cabana Queen, this one has an opalescent microshimmer throughout. It's a little less brighter, more green than turquoise in person. I like this color but again, I used four coats plus top coat, though it didn't really need a top coat for shine.


Thoughts? I have conflicting feelings about these polishes. While I like the color, the amount of coats it took me to cover up bald spots is turning me off. I've tried waiting for each coat to dry completely before applying the next coat but it still leaves bald spots. It's also a bit runny, and will tend to pool in your cuticles if you get too close. It's a shame because the colors are pretty.

Would I recommend these polishes? Yes and no. If you're okay with the amount of coats that it takes to cover up bald spots, then go for it. Personally, I don't mind the number of coats but if you do then I suggest skipping it and finding a color similar to it.


That's it for today's post! I hope you'll join me again next time. :)


*I bought these polishes with my own money. Revlon can be found in most retail stores and drugstores. These were bought at Walgreens for $4.99 each.*


*Disclaimer: Due to variations in screen displays and resolutions, polishes may appear different to each reader. I try my best to capture colors as accurately as I can, and if I can't, then I try to describe the color/s to the best of my ability.*

Thursday, June 13, 2013

Indie Thursdays: Messy Jessi Speckled Egg Collection

Hi errbody! For this week's Indie Thursday, I have Messy Jessi's debut collection: the Speckled Egg.

I came across this collection on Instagram, when I saw teasers and swatches from some of the girls I am following. I thought to myself, "I should have these polishes!" It was on a preorder status at the time. After I talked to Jessi, the lovely owner, I was able to snag a set for the preorder price even though it ended a few days earlier before I paid. See, Jessi is a really sweet person!

Who is Messy Jessi? (copied from her website:)


About
Hand-blending custom nail lacquer for the modern woman and man. All lacquers are hand-blended in very small batches, typically on-demand! Have a look around and be sure to come back often! Love, Messy Jessi

So, without further ado, I present to you the gorgeous Speckled Egg polishes!


Warm Collection: Quail, Finch, House Wren
Cool Collection: Mockingbird, Snowy Plover, Easter Bunny
The collection is divided into two: The Warm and the Cool  collection. It also came with a preorder-exclusive glitter top coat, Speckled. All of the polishes have black hex glitter of different sizes.


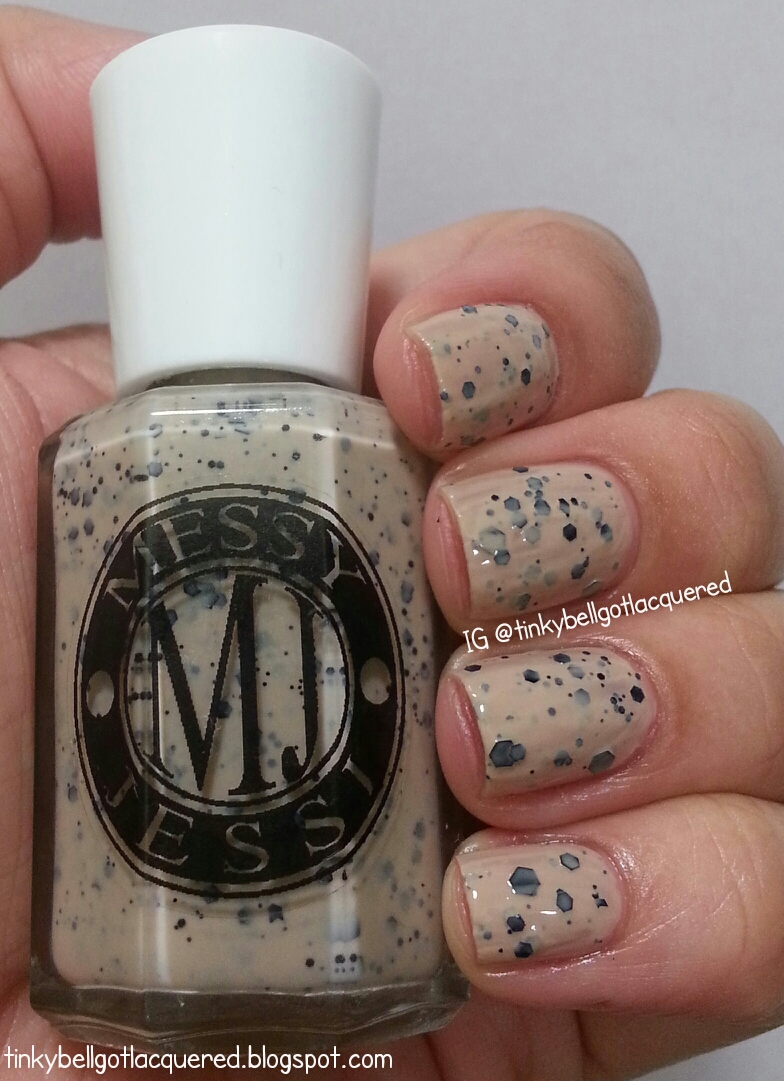
Let's start with the Warm collection. First up: Quail.


Quail is the one that looks most like an egg to me, like a quail egg! It's in a milky nude base, kinda like coffee with tons of creamer. I used two coats plus top coat.


Next, we have Finch.


Finch is a milky minty green base. Makes me think of mint chocolate chip ice cream!I used three coats plus top coat.


Rounding up the Warm collection is House Wren.


House Wren is a milky pink base. Like a strawberry smoothie :) I used three coats plus top coat.


Now the Cool Collection. First up, Mockingbird.


Mockingbird is a milky pale blue. Lighter than a robin's egg blue, but pretty nonetheless. I used three coats plus top coat.


Next, we have Snowy Plover.


Snowy Plover is a pale gray that doesn't look quite like concrete. It's a beautiful shade of pale gray. I used two coats plus top coat.


Last but not the least, we have Easter Bunny.


Easter Bunny is a milky pale lavender base. I used three coats plus top coat.


And here's the preorder exclusive top coat, Speckled.


Speckled is a clear base with the same black glitters as the above polishes. I placed it over a Skittles mani to show how it looks on different polishes. This could probably look cool over a white base too. I used one coat on all nails, plus top coat.


Thoughts? I LOVE these polishes. I cannot afford the Illamasqua ones and these were a cheaper, but just as pretty, alternative. Granted, the Illamasquas have smaller glitter, but they're pretty much in the same family. I love how easy the polishes were to work with. Even though some colors took three coats, I don;t mind because they dried really fast! Plus, they have a very good glitter payoff, so I'm happy with that. No need to fish around so much for the bigger pieces.


Would I recommend these polishes? YES. They are sold out now, but maybe Jessi will bring them back someday? *insert hopeful face here* Even though this is her first collection, it did not disappoint due to the prettiness and the quality of the polishes.


There you have it for! I hope you enjoyed this post as much as I enjoyed writing it. Til the next time! :)


*I bought these polsihes with my own money from Messy Jessi. It is sold out as of now. You can contact her on her website, Instagram, and Facebook.*


*Disclaimer: Due to variations in screen displays and resolutions, polishes may appear different to each reader. I try my best to capture colors as accurately as I can, and if I can't, then I try to describe the color/s to the best of my ability.*